
Wenn man eine ioBroker Instanz hat, in die man schon viel Zeit und Mühe gesteckt hat, ist es sinnvoll hin und wieder ein Backup anzulegen. Wie das genau geht, will ich euch in diesem Artikel zeigen. [toc]
Erstellen des ioBroker Backups
Ein Backup von ioBroker zu erstellen ist nicht weiter schwer. Dazu müssen wir uns als erstes zu dem System auf dem ioBroker läuft verbinden.
Anschließend wird ioBroker gestoppt, damit während dem Backup keine Änderungen der Daten stattfindet.
systemctl stop iobrokerNachdem ioBroker gestoppt ist, können wir das Backup erstellen. Dafür wird der folgende Befehl ausgeführt:
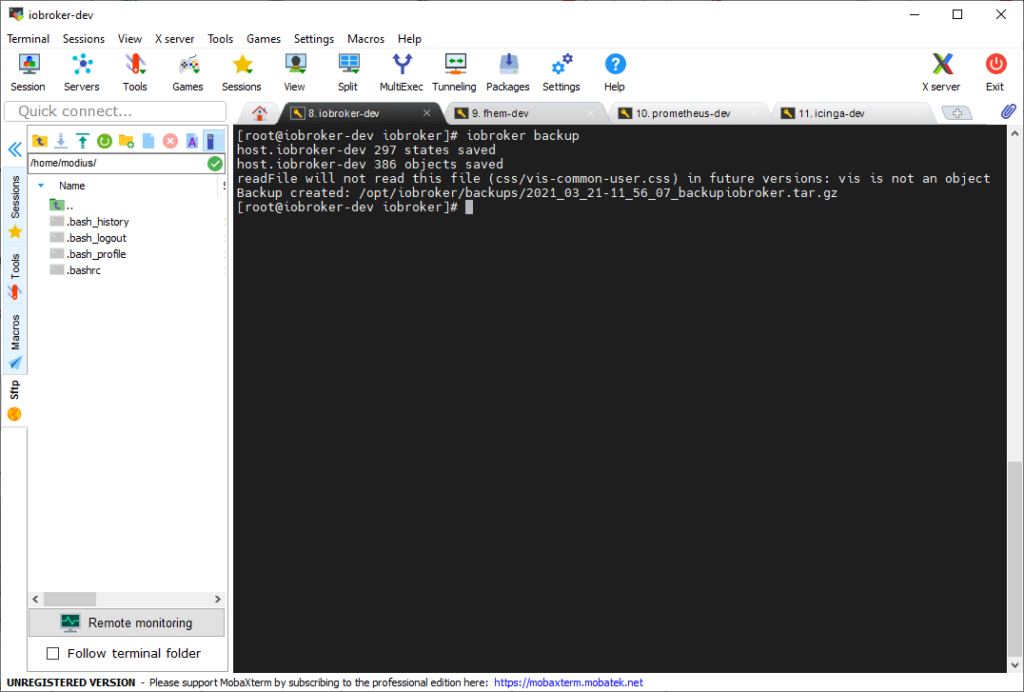
iobroker backup

host.iobroker 354 states saved
host.iobroker 448 objects saved
Backup created: /opt/iobroker/backups/2020_06_23-10_35_59_backupiobroker.tar.gz
In der Ausgabe können wir den Speicherort des Backups sehen. Idealerweise kopiert man dieses Backup nun noch wo anders hin (zb. USB-Stick oder NAS).
ioBroker Backup wieder einspielen
Um das Backup von ioBroker wieder einzuspielen, muss das Backup in dem Backup Ordner (/opt/iobroker/backups) liegen. Bei einer neuen ioBroker Instanz muss dieses Verzeichnis zuerst angelegt werden.
Das letzte Backup kann dann mit den folgenden Befehl restored werden (ioBroker muss dabei wieder gestoppt sein):
iobroker restore 0Nachdem das Backup eingespielt wurde, müssen noch die Adapter aktiviert werden.
iobroker start all Nun kann ioBroker wieder gestartet werden.
systemctl start ioBroker
Hallo,
vielen Dank für die Erklärung. Allerdings bietet sich mir ein Problem und zwar kann ich über die Konsole mit Mac ein Backup herstellen. Wenn ich allerdings die Speicherkarte aus Rasp. in den Mac stecke bekomme ich keine Ordnerstruktur wie beschrieben angezeigt. Wie sollte man hier vorgehen?
Mit freundlichen Grüßen,
Seb
Hallo Sebastian,
kannst du etwas genauer erklären was du gemacht hast?
Ich vermute du hast ein Backup auf dem Raspberry gemacht und dann die SD Karte in den Rechner gesteckt. Wenn ja, dann hast du recht, dass funktioniert nicht ohne weiteres.
Wenn du das Backup auf einem anderen System haben möchtest ist es am einfachsten, einen USB STick an den Pi anzuschließen und schließend das Backup mit dem Befehl cp auf den USB Stick zu kopieren.
Hoffe das hilft dir weiter.
Gruß
Christian
Hallo zusammen!
Ich hatte IOBroker über die QNAP Container Sation (Docker) laufen. Da ich in ein anderes IP Netz gezogen bin habe ich den Container neu aufgesetzt und dazu ein Backup des IOBrokers gemacht. Dieses versuche ich jetzt wieder einzuspielen.
Leider scheint das System immer genau an dem Punkt hängen zu bleiben:
——————————————————————————–
————————- 2023-01-24 21:31:10 ————————-
——————————————————————————–
—– —–
—– ██╗ ██████╗ ██████╗ ██████╗ ██████╗ ██╗ ██╗ ███████╗ ██████╗ —–
—– ██║ ██╔═══██╗ ██╔══██╗ ██╔══██╗ ██╔═══██╗ ██║ ██╔╝ ██╔════╝ ██╔══██╗ —–
—– ██║ ██║ ██║ ██████╔╝ ██████╔╝ ██║ ██║ █████╔╝ █████╗ ██████╔╝ —–
—– ██║ ██║ ██║ ██╔══██╗ ██╔══██╗ ██║ ██║ ██╔═██╗ ██╔══╝ ██╔══██╗ —–
—– ██║ ╚██████╔╝ ██████╔╝ ██║ ██║ ╚██████╔╝ ██║ ██╗ ███████╗ ██║ ██║ —–
—– ╚═╝ ╚═════╝ ╚═════╝ ╚═╝ ╚═╝ ╚═════╝ ╚═╝ ╚═╝ ╚══════╝ ╚═╝ ╚═╝ —–
—– —–
—– Welcome to your ioBroker Docker container! —–
—– Startupscript is now running! —–
—– Please be patient! —–
——————————————————————————–
——————————————————————————–
—– System Information —–
—– arch: x86_64 —–
—– hostname: IOHost —–
—– —–
—– Version Information —–
—– image: v7.2.0 —–
—– build: 2023-01-12T23:45:21+00:00 —–
—– node: v16.19.0 —–
—– npm: 8.19.3 —–
—– —–
—– Environment Variables —–
—– SETGID: 1000 —–
—– SETUID: 1000 —–
——————————————————————————–
——————————————————————————–
—– Step 1 of 5: Preparing container —–
——————————————————————————–
This is not the first run of this container. Skipping first run preparation.
——————————————————————————–
—– Step 2 of 5: Detecting ioBroker installation —–
——————————————————————————–
Existing installation of ioBroker detected in „/opt/iobroker“.
——————————————————————————–
—– Step 3 of 5: Checking ioBroker installation —–
——————————————————————————–
(Re)setting permissions (This might take a while! Please be patient!)… Done.
Fixing „sudo-bug“ by replacing sudo with gosu… Done.
Hostname in ioBroker matches the hostname of this container.
No action required.
——————————————————————————–
—– Step 4 of 5: Applying special settings —–
——————————————————————————–
Some adapters have special requirements/ settings which can be activated by the use of environment variables.
For more information see ioBroker Docker Image Docs (https://docs.buanet.de/iobroker-docker-image/docs/).
——————————————————————————–
—– Step 5 of 5: ioBroker startup —–
——————————————————————————–
Starting ioBroker…
##### #### ### ## # iobroker.js-controller log output # ## ### #### #####
================================== > LOG REDIRECT system.adapter.admin.0 => true [starting]
host.iobroker check instance „system.adapter.admin.0“ for host „IOHost“
host.iobroker check instance „system.adapter.node-red.0“ for host „IOHost“
host.iobroker check instance „system.adapter.onkyo.0“ for host „IOHost“
host.iobroker check instance „system.adapter.openknx.0“ for host „IOHost“
host.iobroker check instance „system.adapter.ping.0“ for host „IOHost“
host.iobroker check instance „system.adapter.tr-064.0“ for host „IOHost“
host.iobroker check instance „system.adapter.discovery.0“ for host „IOHost“
host.iobroker check instance „system.adapter.backitup.0“ for host „IOHost“
host.iobroker check instance „system.adapter.ecovacs-deebot.0“ for host „IOHost“
host.iobroker check instance „system.adapter.net-tools.0“ for host „IOHost“
host.iobroker check instance „system.adapter.tankerkoenig.0“ for host „IOHost“
host.iobroker check instance „system.adapter.tvprogram.0“ for host „IOHost“
host.iobroker check instance „system.adapter.vis-inventwo.0“ for host „IOHost“
host.iobroker check instance „system.adapter.vis.0“ for host „IOHost“
host.iobroker check instance „system.adapter.web.0“ for host „IOHost“
host.iobroker check instance „system.adapter.wled.0“ for host „IOHost“
Hat hier jemand eine Idee?! Oder muss ich das mal mehrere Stunden so stehen lassen?